pages

Showing posts with label Family. Show all posts

Tuesday, June 25, 2013

DIY PVC Water Sprinkler

DIY PVC Water Sprinkler

We just got finished making a pretty big move to the nice warm, humid state of Louisiana. Oh let me tell you this girl was not made for the humidity. I would be lying if I didn't say I thought I was dying my first day here. Now that we are rolling up on a week, I am starting to get used to the heat, granted I don't like it, but if I never got used to it I would be sitting in my house all summer long probably watching mind numbing reality tv.

My kids on the other hand, HA, heat shmeat, they want to be outside. After the first initial days of unpacking the u-haul and unpacking the necessities it was time to get outside. Thank goodness we found a house with a nice backyard and its fenced in. No more worrying about one of the boys pulling a Houdini and disappearing on me.

After scouring the internet on water toys etc. I remembered that my friend Kelly over at Here comes the sun, made this wonderful water sprinkler for her kids out of PVC piping. Creative yes, cheap yes and its quite durable.

I changed it up a little bit but the overall design is the same.

Here is what you are going to need:

2 10-foot pieces of 3/4 inch PVC pipe
2 slip on t-connectors
2 90-degree slip on elbow joints
3 end caps
a hose connector, found in the same place as the other PVC joint pieces
drill with a 1/16" drill bit
a saw or a PVC pipe cutter


First lets cut the PVC. Take one of the 10' pieces and cut into two 5' pieces. Then take the other 10' piece and cut into one 4' piece and four 18" pieces.

Now lets drill the holes into the 4' piece. Temporarily slip on the t-connectors to help stabilize the pipe as you are drilling. Using the 1/16" drill bit, put your holes every couple inches. The more holes you drill in the wetter you will get.

Now lets assemble! Remove the t-connectors and replace them with the elbow joints. Attach the two 5' pieces to your drilled piece of PVC to make a large U-shape. Put the t-connectors at the ends of the 5' pieces and attach the 18" sections to form a base. Now place the end caps on three of the open 18" pieces. On the final opening, attache your hose connector.


Hook up your hose and start having some fun!


post signature


Sunday, March 31, 2013

Easter Centerpieces

To all of my readers who celebrate Easter, Happy Easter. Unlike every other year, I decided not to get out my Easter decorations. We are making a big move in only 2 months and I did not feel like rummaging through boxes to get to them. 

Yesterday while we were out running errands, my oldest son found the prettiest bouquet of flowers. With those big brown eyes, he looked at me and said "can we at least put these on our table?" All right, how could I say no to that face....off to Dollar Tree we went, WITH our new bouquet of flowers.

I wanted to find something inexpensive just in case we decided to through it away instead of packing it. Not only was this under $8 bucks, it came out super cute and it will be packed into a box and will find a place on the table next Easter.

Easter grass, any color
bunny peeps
jelly beans
glass container
egg decorations


First pour the jellybeans into the glass containers. Fill about 1/4 of the way full.


Next line up your bunny peeps all around the container.


Now fill the middle in with the Easter grass.


Take your egg decorations and stick them into the grass, through the jellybeans until you hit bottom. 


Voila! As you can see, my oldest was quite proud of himself. He did a wonderful job. Looks like he will be making them next year too.


post signature

Tuesday, March 19, 2013

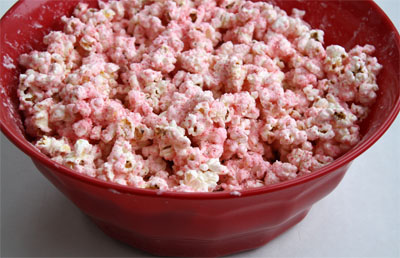
Peep Popcorn


Easter is just around the corner and I don't know about you but it has to be one of my favorite holidays for candy. Walking down the aisle looking at the array of color peeps and the wonderful hint of a yellow bag, stuffed a mile high into an end-cap full of Reese peanut butter eggs. 

As I begin to hoard these precious yummys in my pantry ready for my consumption, I ran across a brilliant idea on the internet, peeps in popcorn. Oh yea, someone had the great idea. Peeps are just marshmallows, sugar and coloring, so why not experiment with them a little.

This would be a great addition for an Easter party, at your Easter dinner, heck it would be good anytime!


Ingredients
  • 2-3 cups popcorn, un-buttered and unsalted
  • 2 tsp butter
  • 5 individual Peeps
Directions
  • Place popped popcorn in a bowl.
  • In a small saucepan, melt butter over low to medium heat. Once all of the butter is melted, add Peeps.
  • Stir continuously until all Peeps are melted and mixture is smooth and even in color.
  • Remove from heat and pour hot marshmallow mixture over popcorn. Stir gently with a rubber spoon to ensure all pieces are coated.
  • Spread popcorn on wax paper and allow to cool. Once cooled, place into an airtight container for storage.
That’s it! Easy, right? This is a fun and festive snack for the kids to take into school as well.


post signature


Wednesday, February 27, 2013

Shaving cream bathroom paints


What child doesn't love spending hours in the bathtub, only willing to get out when their toes and fingers look like prunes? Mine!

We have countless amounts of toys in our bathtub. Anything from planes, cars, letters, people, tub crayons...you name it we have it or did. The crayons have to be one of the most tedious things to clean off the tub surround. If you don't clean it immediately, get ready to use some elbow grease. Personally, I only plan to use that amount of work once a week, when the tub gets its normal scrub down. 

So I wanted to find something that could replace the crayons, because they are a huge hit with my kids, but something that could clean up a lot easier. Not only clean up easier but a little cheaper. 

Bathroom paint! 2 ingredients, that is it! 

Take a muffin tin and an old paintbrush, or your kids can just use their hands. Fill each cup with shaving cream. Grab a few cans at the dollar store. Who knew $1 could be so much fun. Then place a few drops of food coloring, any colors, into the piles of foam, mix and voila you have paint!

Let your kids enjoy and paint a mural....who knows, you might have the next Picasso on your hands!


Tuesday, February 26, 2013

Helping your child write their name

My youngest is only 3. It's amazing how he is more curious about learning then my oldest son was at this age. I am sure it has something to do with watching his big brother come home, get a snack and sits down at the kitchen table as we tackle that nights homework.  Of course he has to do everything his brother does. So Carter will pull up a chair, ask for a pen and paper and will usually sit there and draw pictures and random shapes as Cameron works. 

A few months ago, Carter and I started tracing shapes and letters. I bought these amazing cut outs at the Dollar Tree and taped them up to his walls. We will sit in our bean bags and spend part of our morning tracing and saying their names. Now that he is getting a little more used to using a pencil, I thought it was about time to start tackling his name. 

I found this amazing online program where you can type in your child's name and it will automatically write their name on the lines. You print it and they trace it. It beats having to take a piece of paper and make all the dotted letters yourself!


Thursday, February 21, 2013

Homemade Rainbow Wheat Bread


I have dabbled in making my own bread for a few months, but when I spotted a picture of RAINBOW bread on Pinterest, I knew I had to try it. My boys thought this was one of the coolest things that I have ever made! My oldest sons teacher even sent me a note home telling me that his rainbow sandwich was a hit during lunch time. 

If you have ever wanted to try to make your own bread, this is the recipe to start with. It is easy and does not take very long to make.


The recipe makes 2 loaves and is for a basic very soft white bread that could easily be changed to a wheat bread {just use 3 cups wheat flour and 3 cups white flour in place of the 6 cups white flour}.  

Its actually perfect for sandwiches because it stays soft {I wrapped one loaf in press & seal wrap, foil and froze it for later } and is easy to slice into normal sandwich bread thickness.


Ingredients to Make 2 Loaves:
-2 cups warm water 
-2/3 cup sugar
-1 1/2 tsp salt
-1/4 cup canola or vegetable oil
-3 cups all-purpose flour
- 3 cups of whole wheat flour
-1 1/2 tbsp yeast
-food coloring


In a large bowl, dissolve the sugar in the warm water.


After the sugar is dissolved, stir in the yeast.


, Allow the mixture to "proof" until the yeast resembles a creamy foam.


Into the yeast mixture, add the salt and the oil. Gradually mix in the flour, only one cup at a time. On a lightly floured surface, knead the dough until smooth and place in a well oiled bowl, turning the dough to coat. Cover the bowl with a damp cloth and allow to rise until doubled in bulk. This usually takes about one hour.

Once the dough is finished, remove the dough from the pan onto a lightly floured surface. Divide the dough into 6 equal pieces, using a knife.


Mix in the food coloring to each dough ball to get the colors of the rainbow; since the food coloring is liquid you will probably need to mix in a bit more flour with the coloring to keep a nice, not too sticky dough {make sure you keep them separate and you probably don't want to set them on your counter, they may stain it with the colors}:
RED: red food coloring
ORANGE: a combination of red and yellow food coloring
YELLOW: yellow food coloring
GREEN: most basic packages of food coloring have green in them, although if yours doesn't mix a combination of yellow and blue
BLUE: blue food coloring
VIOLET/PURPLE: a combination of red and blue food coloring


 To assemble the RAINBOW, lightly grease your work surface and your rolling pin.
Roll the red out to a roughly 11 x 14 inch rectangle, then place it on another greased surface. Use a knife to cut the dough in half.


Grease 2  9x5 loaf pans.Carefully roll each half into a log. Place into your prepared pans. Preheat oven to 350 degrees.
Place loaf pans on the top of the oven, cover with a clean kitchen towel and allow to rise about 30-45 minutes (the heat from the preheating oven will help the dough rise). 
Bake for 30 minutes. 


Wait 5-10 minutes and remove bread from pans, place on wire rack to cool completely.


Monday, February 18, 2013

Babysitter Info Sheets

My boys are my whole world! And when my husband and I get the rare moment to go on a date night, we call our favorite sitter to come and hand out with our rambunctious boys. There are times though were we have to call a different sitter when ours is not available and I always try to ensure she is all set with any piece of information that she could need.

Being 6 and 3, I am sure my boys keep their sitters busy with playing soldiers or taking them outside to jump on the trampoline, so I want to make sure that if there is anything that she might need, it is readily available for  her. 


I found this Babysitter Info printable online and thought it was a great idea. I have a folder up on the wall of my pantry that holds recipes or extra papers I might need and now holds a blank stack of these. You can download a copy of the sheet here.

This is the example from the link above. 

Saturday, February 16, 2013

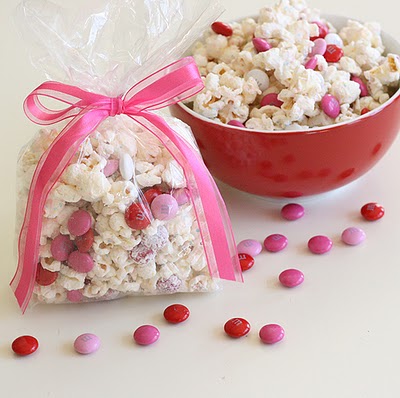
Sweet and Salty Valentine Popcorn


I always like to have little treats around for the boys during the holidays. I usually leave them next to their door so that when they wake up they have a nice little surprise waiting for them. As most moms know, kids have WAY too much when it comes to knick knacks and toys, so I usually go with something they can eat. Who doesn't love holiday treats?!

So for Valentines I am going with something, cute, sweet and festive. Valentine popcorn! I mean could anyone resist popcorn covered in candy melts, sprinkled with sea salt and tossed with red and pink M&M's...I think not. Happy Early Valentines Day!


You will need:

1/2 cup of unpopped popcorn
1 bad of candy melts
1 bag of Valentine M&M's
sea salt

First, pop your popcprn and set aside.

Now over a double boiler on low heat, lets melt the candy melts. Stirring occasionally so they do not burn.


Once completely melted, pour over the popcorn and toss until the popcorn is fully coated.


Add sea salt to taste.

Add in the M&M's. 


On a sheet pan covered in wax paper, spread the popcorn onto the wax paper and let it sit there until it has set, dried. 


source


Now go and enjoy it with your kids, your Valentines or keep it all to yourself!

Friday, February 8, 2013

Valentine Heart Rice Krispies

My husband will be gone for yet another holiday. With the boys and I at home, I always try to find something fun to do with them for the smaller holidays. Yesterday we made 'Valentines' Rice Krispie treats. I actually let them get in there and do it all!

Of course the chaos in the kitchen with a 6 year old and 3 year old could drive you bonkers, but watching how much fun they were having was well worth the sticky, buttery kitchen in the end. 

This is nothing fancy, no frills, just plain old rice krispies with a little pizzazz.

The end result will be a yummy batch of goodies and the big smiles on your children's faces!

Here is what you will need: 

3 tbsp of butter
1 bag of mini marshmallows
6 cups of Rice Krispie cereal
red food coloring


Melt your butter in a large pan.


Add your marshmallows...I know I stated mini marshmallows but all I had on hand were the big ones.


Grab your little helper and stir, stir, stir.


Let the marshmallows begin to melt.


Add in some red food coloring. Add as much or as little as you want.


Here is your yummy pink melted marshmallows! Add in your cereal and mix it all together.


Now my oldest made this one for me, it really made my day. He told me to save it for Valentine's Day.....yea, it didn't last an hour!


Place the cereal and marshmallow mix into a well buttered pan. Cut into any shape you want to. My boys decided to just cut them into rectangles.