pages

Showing posts with label homemade. Show all posts

Wednesday, September 4, 2013

Pumpkin Pie Milkshake

Pumpkin Pie Milkshake

It is finally September, that means cooler weather and the invasion of everything pumpkin. For me, the pumpkin invasion is a welcomed sight. 

This is my first year spending late summer/early fall in the south and it seems like the cooler weather is never coming. Low 90's as the high almost everyday this week doesn't make for the perfect weather for a pumpkin spice latte. I imagine a piping warm cup of pumpkin, tall boots, sweaters, college football and the crisp wind biting at my ears but here we are still in shorts, flipflops and carrying around sunscreen in my purse, sigh....where is fall.

So to get my pumpkin craving under control, I switched it up a bit.  Honestly I have never tried a cold pumpkin drink but the outcome was wonderful. Something I could sip on while I watch  my kids play on the tramploine and in the pool dreaming of those cooler days to come.....well hopefully!

Here is what you will need:

1/4 cup of pureed pumpkin
2 cups of your favorite vanilla milkshake
3/4 teaspoon on pumpkin pie spice
nutmeg and cinnamon 

Add the pumpkin, ice cream and pumpkin pie spice into the blender. 
Blend until nice and smooth. 
Transfer the milkshake to a cup and garnish with a dash of nutmeg and cinnamon on top.

You could add some whipped cream and crushed vanilla wafers to the top for an extra little garnish.


post signature

                                                                                                         image


Tuesday, April 16, 2013

Coconut Honey DIY Lip Scrub


Even though we are leaving behind the cold winter months, I still like to give my lips a little TLC during the warmer months.

 Lip balm and chapstick will not be able to do there job if they don't have a good foundation to work with. With the summer time rapidly approaching and the countless hours we are going to be spending soaking up the sun, make sure to love on your lips at least once a week just like you would do for your body.

Here is a simple and easy DIY. Once it is made make sure to remember it only has a shelf life of about 2 weeks. So if you make a big batch, give it out to your girlfriends!


Coconut Honey Lip Scrub
1 tbs honey
1 tbs sugar
1/2 tbs olive oil
1/2 tbs coconut oil

Mix all ingredients to combine. Apply a pea size portion to your lips and rub gently with your index finger. Rinse with warm water and apply your favorite moisturizing chapstick.


post signature


Images from style within


Tuesday, March 19, 2013

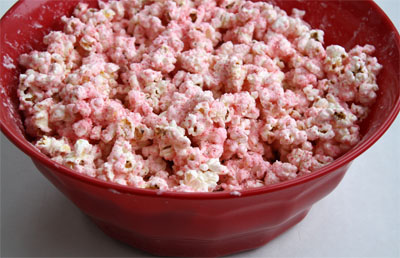
Peep Popcorn


Easter is just around the corner and I don't know about you but it has to be one of my favorite holidays for candy. Walking down the aisle looking at the array of color peeps and the wonderful hint of a yellow bag, stuffed a mile high into an end-cap full of Reese peanut butter eggs. 

As I begin to hoard these precious yummys in my pantry ready for my consumption, I ran across a brilliant idea on the internet, peeps in popcorn. Oh yea, someone had the great idea. Peeps are just marshmallows, sugar and coloring, so why not experiment with them a little.

This would be a great addition for an Easter party, at your Easter dinner, heck it would be good anytime!


Ingredients
  • 2-3 cups popcorn, un-buttered and unsalted
  • 2 tsp butter
  • 5 individual Peeps
Directions
  • Place popped popcorn in a bowl.
  • In a small saucepan, melt butter over low to medium heat. Once all of the butter is melted, add Peeps.
  • Stir continuously until all Peeps are melted and mixture is smooth and even in color.
  • Remove from heat and pour hot marshmallow mixture over popcorn. Stir gently with a rubber spoon to ensure all pieces are coated.
  • Spread popcorn on wax paper and allow to cool. Once cooled, place into an airtight container for storage.
That’s it! Easy, right? This is a fun and festive snack for the kids to take into school as well.


post signature


Tuesday, March 5, 2013

Baked Oatmeal in-a-mug

"Baked" Oatmeal In A Mug

I don't know about you but I loathe getting up in the morning. I am definitely not a morning person. It takes all my power to pull myself out of bed at 6 am to get my morning started. I am usually answering emails, drinking coffee, getting breakfast ready for the boys and getting them up and ready to start their morning routine.

 Usually around 9 I am thinking to myself, have I even eaten. Other than my ever present coffee mug, I seem to always forget to eat. Then by the time I remember, I don't feel like making anything, so I grab whatever is close by. 

So that is how my meals-in-a-mug started. Through a few ingredients into a coffee mug, put it in the microwave and within a few minutes, I have a yummy meal. Simple, easy and I cannot complain about not eating properly. 

Here is my take on the champion of breakfast foods, oatmeal!


1/2 cup quick cooking oats
1 tbsp ground flax seed
1 egg
1/3 of a banana, mashed
1/4 tsp cinnamon
1/2 of an apple, chopped
2 tsp honey

Add oats, flax and egg in a mug. Stir well with a fork. Add banana, cinnamon, apple and honey. Stir again until fully combined. Cook in microwave on high for 2-3 minutes. Fluff with a fork.
Stir in a little milk or yogurt or nut-butter if desired.


Recipe adapted from Food and Whine

Wednesday, February 27, 2013

Shaving cream bathroom paints


What child doesn't love spending hours in the bathtub, only willing to get out when their toes and fingers look like prunes? Mine!

We have countless amounts of toys in our bathtub. Anything from planes, cars, letters, people, tub crayons...you name it we have it or did. The crayons have to be one of the most tedious things to clean off the tub surround. If you don't clean it immediately, get ready to use some elbow grease. Personally, I only plan to use that amount of work once a week, when the tub gets its normal scrub down. 

So I wanted to find something that could replace the crayons, because they are a huge hit with my kids, but something that could clean up a lot easier. Not only clean up easier but a little cheaper. 

Bathroom paint! 2 ingredients, that is it! 

Take a muffin tin and an old paintbrush, or your kids can just use their hands. Fill each cup with shaving cream. Grab a few cans at the dollar store. Who knew $1 could be so much fun. Then place a few drops of food coloring, any colors, into the piles of foam, mix and voila you have paint!

Let your kids enjoy and paint a mural....who knows, you might have the next Picasso on your hands!


Thursday, February 21, 2013

Homemade Rainbow Wheat Bread


I have dabbled in making my own bread for a few months, but when I spotted a picture of RAINBOW bread on Pinterest, I knew I had to try it. My boys thought this was one of the coolest things that I have ever made! My oldest sons teacher even sent me a note home telling me that his rainbow sandwich was a hit during lunch time. 

If you have ever wanted to try to make your own bread, this is the recipe to start with. It is easy and does not take very long to make.


The recipe makes 2 loaves and is for a basic very soft white bread that could easily be changed to a wheat bread {just use 3 cups wheat flour and 3 cups white flour in place of the 6 cups white flour}.  

Its actually perfect for sandwiches because it stays soft {I wrapped one loaf in press & seal wrap, foil and froze it for later } and is easy to slice into normal sandwich bread thickness.


Ingredients to Make 2 Loaves:
-2 cups warm water 
-2/3 cup sugar
-1 1/2 tsp salt
-1/4 cup canola or vegetable oil
-3 cups all-purpose flour
- 3 cups of whole wheat flour
-1 1/2 tbsp yeast
-food coloring


In a large bowl, dissolve the sugar in the warm water.


After the sugar is dissolved, stir in the yeast.


, Allow the mixture to "proof" until the yeast resembles a creamy foam.


Into the yeast mixture, add the salt and the oil. Gradually mix in the flour, only one cup at a time. On a lightly floured surface, knead the dough until smooth and place in a well oiled bowl, turning the dough to coat. Cover the bowl with a damp cloth and allow to rise until doubled in bulk. This usually takes about one hour.

Once the dough is finished, remove the dough from the pan onto a lightly floured surface. Divide the dough into 6 equal pieces, using a knife.


Mix in the food coloring to each dough ball to get the colors of the rainbow; since the food coloring is liquid you will probably need to mix in a bit more flour with the coloring to keep a nice, not too sticky dough {make sure you keep them separate and you probably don't want to set them on your counter, they may stain it with the colors}:
RED: red food coloring
ORANGE: a combination of red and yellow food coloring
YELLOW: yellow food coloring
GREEN: most basic packages of food coloring have green in them, although if yours doesn't mix a combination of yellow and blue
BLUE: blue food coloring
VIOLET/PURPLE: a combination of red and blue food coloring


 To assemble the RAINBOW, lightly grease your work surface and your rolling pin.
Roll the red out to a roughly 11 x 14 inch rectangle, then place it on another greased surface. Use a knife to cut the dough in half.


Grease 2  9x5 loaf pans.Carefully roll each half into a log. Place into your prepared pans. Preheat oven to 350 degrees.
Place loaf pans on the top of the oven, cover with a clean kitchen towel and allow to rise about 30-45 minutes (the heat from the preheating oven will help the dough rise). 
Bake for 30 minutes. 


Wait 5-10 minutes and remove bread from pans, place on wire rack to cool completely.