pages

Showing posts with label Crafts. Show all posts

Tuesday, June 25, 2013

DIY PVC Water Sprinkler

DIY PVC Water Sprinkler

We just got finished making a pretty big move to the nice warm, humid state of Louisiana. Oh let me tell you this girl was not made for the humidity. I would be lying if I didn't say I thought I was dying my first day here. Now that we are rolling up on a week, I am starting to get used to the heat, granted I don't like it, but if I never got used to it I would be sitting in my house all summer long probably watching mind numbing reality tv.

My kids on the other hand, HA, heat shmeat, they want to be outside. After the first initial days of unpacking the u-haul and unpacking the necessities it was time to get outside. Thank goodness we found a house with a nice backyard and its fenced in. No more worrying about one of the boys pulling a Houdini and disappearing on me.

After scouring the internet on water toys etc. I remembered that my friend Kelly over at Here comes the sun, made this wonderful water sprinkler for her kids out of PVC piping. Creative yes, cheap yes and its quite durable.

I changed it up a little bit but the overall design is the same.

Here is what you are going to need:

2 10-foot pieces of 3/4 inch PVC pipe
2 slip on t-connectors
2 90-degree slip on elbow joints
3 end caps
a hose connector, found in the same place as the other PVC joint pieces
drill with a 1/16" drill bit
a saw or a PVC pipe cutter


First lets cut the PVC. Take one of the 10' pieces and cut into two 5' pieces. Then take the other 10' piece and cut into one 4' piece and four 18" pieces.

Now lets drill the holes into the 4' piece. Temporarily slip on the t-connectors to help stabilize the pipe as you are drilling. Using the 1/16" drill bit, put your holes every couple inches. The more holes you drill in the wetter you will get.

Now lets assemble! Remove the t-connectors and replace them with the elbow joints. Attach the two 5' pieces to your drilled piece of PVC to make a large U-shape. Put the t-connectors at the ends of the 5' pieces and attach the 18" sections to form a base. Now place the end caps on three of the open 18" pieces. On the final opening, attache your hose connector.


Hook up your hose and start having some fun!


post signature


Saturday, April 13, 2013

How to glam up your iPhone


So I know I am late to the iPhone game but I have finally traded in my beaten up android for the iPhone 5. The one complaint I have about the iPhone is that it looks like everyone else's.

Yes I can get a snazzy phone cover but when it comes down to it my iPhone screen looks just like my husbands iPhone screen and that just doesn't work for me.

While browsing the App Store I came across this really neat app called CocoPPa. I believe it had to originate somewhere in Asia because a lot of the writing is not in English. Don't let that through you though!

It's super easy to turn your home screen into something cute, chic and girly or whatever you like.


Start by downloading the app CocoPPa.

Open up your app. This is what the home screen should look like.


Now scroll to the bottom to the search area and type what icon you want to look for. I choose Facebook because I think almost everyone has that app. It's easier to just search what you are looking for then browsing the other categories they have listed.


So here's the fun part. Just start going thought the pages until you find the icon you love.
Click on the icon.


Now click the brown 'set up link'.


Now you are going to have to choose where you want this icon to take you. Since Facebook is an app that you had to download, chose the 'app search' option.


Type in Facebook.

When you see the Facebook icon show up, choose it.


Choose what you want to name your icon and click ok.


A box will pull up asking you to open up safari, say yes.


Follow the directions on the next screen to place your app on your home screen.


Now you will have to keep your original app, so I placed them in a folder marked originals.

Have fun and decorate the heck out of your home screen!

Here is mine, so far.


post signature

Thursday, April 11, 2013

Customizable Candle Printable


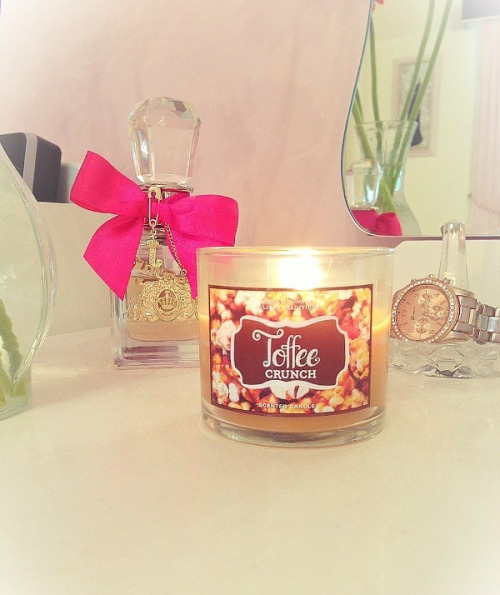
I know that I am not the only person who is in love with Bath and Body Works candles. They have such an enticing smell and with a house full of boys, lighting up one of these on my vanity while I am putting on my make-up takes me to my girly place. A space full of pink, chevron, monograms, heavenly smells and the perfect small chandler hanging from the ceiling. Then reality hits when I step on the poor abandoned hot wheel hidden under my table, which served as a prison for the zombies earlier in the day.

I also love to give these as gifts. But somehow wanted to make them a little more personal. While I was looking for a place to create my own printable monogram, I came across this wonderful post on how to create your own personalized monogrammed candle printable. 

You can also get a little creative by making coordinating matchboxes and gift tags. Go, print out your monogram and get to creating a chic and girly gift for one of your favorite ladies!

customizable candle printables 2 Customizable Candle Printables

Image and the link for the printable from ForChicSake


post signature

Sunday, March 31, 2013

Easter Centerpieces

To all of my readers who celebrate Easter, Happy Easter. Unlike every other year, I decided not to get out my Easter decorations. We are making a big move in only 2 months and I did not feel like rummaging through boxes to get to them. 

Yesterday while we were out running errands, my oldest son found the prettiest bouquet of flowers. With those big brown eyes, he looked at me and said "can we at least put these on our table?" All right, how could I say no to that face....off to Dollar Tree we went, WITH our new bouquet of flowers.

I wanted to find something inexpensive just in case we decided to through it away instead of packing it. Not only was this under $8 bucks, it came out super cute and it will be packed into a box and will find a place on the table next Easter.

Easter grass, any color
bunny peeps
jelly beans
glass container
egg decorations


First pour the jellybeans into the glass containers. Fill about 1/4 of the way full.


Next line up your bunny peeps all around the container.


Now fill the middle in with the Easter grass.


Take your egg decorations and stick them into the grass, through the jellybeans until you hit bottom. 


Voila! As you can see, my oldest was quite proud of himself. He did a wonderful job. Looks like he will be making them next year too.


post signature

Monday, March 25, 2013

Easter bunny origami tag

Easter bunny origami---free template

This week is spring break. I have been scouring the internet for ideas to help keep them occupied . Anything to avoid the countless hours staring at the TV or playing video games. We might not have the perfect Spring weather yet, but I believe that kids need to be outside, exploring, as much as they can. 

We have had a few rainy days so far and after we turned our living room into a fort, played pirates, baked way to many yummy treats, settled down and watched a family movie...I need more ideas for inside play. 

I came across these beautiful tags and thought that my kids could "help" me with them. Theirs came out, interesting, to say the least but they were adorable and will look beautiful when they are adorned on bags full of Easter goodies for the grandparents.


post signature

Wednesday, February 27, 2013

Shaving cream bathroom paints


What child doesn't love spending hours in the bathtub, only willing to get out when their toes and fingers look like prunes? Mine!

We have countless amounts of toys in our bathtub. Anything from planes, cars, letters, people, tub crayons...you name it we have it or did. The crayons have to be one of the most tedious things to clean off the tub surround. If you don't clean it immediately, get ready to use some elbow grease. Personally, I only plan to use that amount of work once a week, when the tub gets its normal scrub down. 

So I wanted to find something that could replace the crayons, because they are a huge hit with my kids, but something that could clean up a lot easier. Not only clean up easier but a little cheaper. 

Bathroom paint! 2 ingredients, that is it! 

Take a muffin tin and an old paintbrush, or your kids can just use their hands. Fill each cup with shaving cream. Grab a few cans at the dollar store. Who knew $1 could be so much fun. Then place a few drops of food coloring, any colors, into the piles of foam, mix and voila you have paint!

Let your kids enjoy and paint a mural....who knows, you might have the next Picasso on your hands!


Sunday, February 10, 2013

DIY Natural Room Scent

I am one of those people who absolutely love to have my house smelling amazing. Whether it is the lingering scent of something baking, my overused Scentsy warmer or a new obsession of mine DIY Natural Room Scents. 

I don't use them as much as I would like to because it usually requires you to keep your stove on and with two smaller children I just don't seen comfortable with that. But I did find a solution. I bought a small crock-pot. Now I don't have to worry about the stove being on and the crock-pot can be put out of reach from the kids.

One of my favorites scents is anise. I know its so cliche, but there is something about that sweet yet spicy aroma that I just love. 

I stumbled across a new room scent that included anise and as soon as it started to warm in the crock-pot I knew I had found my new favorite scent! These are super easy to make and can be customized to your preferences. Play around with some of your favorite scents to come up with new fragrances. 

What you will need---Oranges, cinnamon, cloves, allspice and anise. One reason it is my favorite scent is for it's staying power. This scent carries into multiple rooms better, and it can be reheated to scent your rooms for several days. 

source

How to heat it using a mini slow cooker. Mine only has one low heat setting. The mixture never actually bubbles and visibly steams. I leave it uncovered on my kitchen counter to slowly release scent throughout the day. It's subtle, but creates a pleasant smell in my kitchen and a hint of scent in surrounding rooms. When I'm home, I keep my mini slow cooker going. It's easy and uses very little electricity. When I fill mine in the morning, it won't dry out for an entire day. If you're concerned about accidentally letting it run dry, you can put a lamp timer on it so that it automatically shuts off at the desired time. 

Monday, January 14, 2013

DIY Outdoor Chalkboard


When we moved to North Carolina, we were in the middle of transitioning out of the military. We had moved from Maryland and had no knowledge of the area we were moving to. We basically went were the job wanted us.

We moved into a quaint little cottage house only miles from the beach. We were falling in love with our new town.

While being in our rental, we have had to think of creative ways to make this house our home, while staying within the rules of our rental agency.  We have quite a small backyard with hardly any grassy area, thank goodness for the park across the street or my kids would be driving me bonkers.

The weather stays quite warm on the coast and I believe kids should stay outside, playing as much as possible but I also needed some ideas to help keep them busy in the small amount of yard we have. I came across this on pinterest and my children fell in love.  This is definitely on our weekend to-do list

here is what you are going to need:

  • a 4x6 sheet of plywood…you can get a piece as large or as small as you want
  • outdoor paint in the color that you want
  • non-sanded grout
  • mixing bucket
  • paintbrush


*you can totally by a can of chalkboard paint, but with some of it retailing around $25-$30 and only in select colors, with buying the ingredients to make your own you are able to customize the color and have a lot more paint handy for future projects.

First you are going to mix up your chalkboard paint. A good ratio would be 1 part grout to 8 parts paint. So for a large project like this I would mix 1 cup of grout to ½ gallon of paint. Mix, mix, mix your heart out and make sure that the grout is completely incorporated into the paint.

Once your paint is thoroughly mixed, paint your board. Give it two coats, letting it dry in-between coats.

You need to condition your chalkboard. Get it ready by rubbing the whole board down with chalk, then wiping it off with a dry cloth in circular motions.

Hang it up on your fence, deck rails, wherever you have room! Get ready to enjoy many hours outdoors with your children.


Monday, January 7, 2013

Being crafty with a touch of pink


I am a mom of two wild boys. I am the typical screaming soccer mom on the sidelines and I play the rogue lady zombie hunter hunting down all of the zombies that live in my backyard. I play with trains, cars, toy soldiers and the occasional Call of Duty on Xbox. When one of them gets hurt, I tell them to brush it off, I fish, hike and even go on the occasional hunt for Bigfoot, sometimes dressed in my husband’s old US Navy fatigues, per my boys request. Every day is an adventure being a mom of boys, but there is always that little desire that can only be filled with something pink and sparkly all wrapped up with a tea party.

This summer I was blessed with the most beautiful god-daughter! I was in girl heaven. Just as I was getting used to that beautiful face her parents up and move her 3 states away, thanks to the US Marine Corp. I cannot wait until our big move to Louisiana so that I can be closer to her.

Being around a girl has brought some very creative juices to the surface and I have found a magnificent blog for the crafty, or not so crafty, momma!

So sit back, get ready to scroll and become engrossed in everything girly. It even has me pondering a new addition to the family…..well maybe. After checking out the pictures, go over to one of my favorite blogs, flax & twine for the instructions and more cute diys. 

what girl doesn't love a cute strand of pearls
pearl cuff

lace headband

rose barrettes 

pearl combs

rhinestone combs

rose bracelt

Sunday, January 6, 2013

Lilly Pulitzer Monogram Wallpaper

The DIY Monogrammed phone wallpaper was a huge hit! I am so happy that ya'll loved it. So I decided to show you one more way to GIY, gram-it yourself, your phones wallpaper.

I love to monogram, so I thought I would give it its own little creative name, so I came up with gram-it yourself...a little more unique, just like the monos that you will create!

I have the option on my phone to have a different picture on the lock screen and home screen. The home screen always features my boys, occasionally my husbands face will make an appearance, but my boys handsome faces have priority and the lock screen is always covered in something pink and girly.

Make sure you save a copy of your print to your computer. I am going to show you many more things you can do with your new custom print! Everything from tags, email signatures, facebook photos, coffee mugs--the possibilities are endless


First you will need to go to Google and go explore all of the Lilly prints there are. Make sure to open your picture and save it to your computer. Now you can open it in any picture editing software that you want, I personally used pixlr.


Next you will select the shape that you want to hold your monogram. I chose a circle. Then select what size you would like your shapes border. Now select the color you want to use to fill in the color of your shape and the color of your border. This is the time to become friends with your undo button. Unfortunately, when you go to place your shape, all you will see representing your shape is a very small black line. If it is not where you want it, undo it and start again. It took me about 4 times to get it exactly where I wanted it.


When you have your shape just where you want it, start playing with your font. Make sure to make the center letter, your last initial, the largest letter. 


Now you can save it like this or since I am addicted to the snipping tool, I just snipped out the portion that I wanted and saved that to my computer. Again, just email it to yourself and and upload it as your phones wallpaper. 

Thursday, January 3, 2013

ABC Fabric Magnets

ABC2.jpg


My youngest son just turned 3 in December. Alas he is in that group of kids who will start school late, but with an older brother in school already he is very determined on learning new things.  Santa brought him a Leappad this Christmas and his favorite app so far is “Writing the Alphabet”. The program will say the letter, give a word that starts with the letter and then he has to write the letter correctly 3 times to get a star. He is obsessed!

In his room, I bought alphabet strips from the dollar tree, something that you would see in a classroom, and put them on the wall so that we could start learning the letters. The bad thing with paper on a wall, in a 3 year old boys’ room….well it doesn’t last very long. I think I have re-tapped them to the wall and back together more times than I can count.

I saw this idea on Pinterest and knew that this would be perfect! Not only can he play with them, we can put them on the fridge and after we make our big move, we could use them on the magnetic wall I am dying to have in the playroom!

Grab some extra fabric pieces and lets get to crafting!

Here is what you will need

an assortment of fabric squares
pinking shears
fabric scissors
permanent marker
glue stick
sticker backed magnets, you can get these at a office supply store or craft stores.


For the letters you can download a template here....or you can do them free hand!

First, make sure your fabric is nice and flat.

If you are using large sheets of magnet stickers, cut the paper down into smaller rectangles more suitable to your letter size. 

Lay the fabric right side down on the table. Remove the paper from the sticky side of the magnet and affix the magnet to the fabric. 

Apply pressure with your palm to make a solid bond. 

ABC5.jpg


Using your regular fabric scissors, cut out the magnet and fabric.

Set aside the excess fabric.

Place the magnet on the table with the fabric side down. Place the letter right side down on the magnet, the letter should be reversed so that when you turn the magnet right side up, the letter will be readable.


Trace around the letter with your permanent marker.  

ABC7.jpg


Then cut out the letter using you pinking shears.

ABC8.jpg


Cut out the interiors.

For letters that have interior shapes, like B, you have one more step to complete.

Using your fabric scissors, not your pinking shears, cut a thin slice through the base of the letter.

Switching back to your pinking shears and cut out the bottom shape. Repeat for second shape. Be sure to leave at least at one connecting point in the letter.

ABC10.jpg
images

That's it!!