pages

Wednesday, February 27, 2013

Shaving cream bathroom paints


What child doesn't love spending hours in the bathtub, only willing to get out when their toes and fingers look like prunes? Mine!

We have countless amounts of toys in our bathtub. Anything from planes, cars, letters, people, tub crayons...you name it we have it or did. The crayons have to be one of the most tedious things to clean off the tub surround. If you don't clean it immediately, get ready to use some elbow grease. Personally, I only plan to use that amount of work once a week, when the tub gets its normal scrub down. 

So I wanted to find something that could replace the crayons, because they are a huge hit with my kids, but something that could clean up a lot easier. Not only clean up easier but a little cheaper. 

Bathroom paint! 2 ingredients, that is it! 

Take a muffin tin and an old paintbrush, or your kids can just use their hands. Fill each cup with shaving cream. Grab a few cans at the dollar store. Who knew $1 could be so much fun. Then place a few drops of food coloring, any colors, into the piles of foam, mix and voila you have paint!

Let your kids enjoy and paint a mural....who knows, you might have the next Picasso on your hands!


Tuesday, February 26, 2013

Helping your child write their name

My youngest is only 3. It's amazing how he is more curious about learning then my oldest son was at this age. I am sure it has something to do with watching his big brother come home, get a snack and sits down at the kitchen table as we tackle that nights homework.  Of course he has to do everything his brother does. So Carter will pull up a chair, ask for a pen and paper and will usually sit there and draw pictures and random shapes as Cameron works. 

A few months ago, Carter and I started tracing shapes and letters. I bought these amazing cut outs at the Dollar Tree and taped them up to his walls. We will sit in our bean bags and spend part of our morning tracing and saying their names. Now that he is getting a little more used to using a pencil, I thought it was about time to start tackling his name. 

I found this amazing online program where you can type in your child's name and it will automatically write their name on the lines. You print it and they trace it. It beats having to take a piece of paper and make all the dotted letters yourself!


Thursday, February 21, 2013

Homemade Rainbow Wheat Bread


I have dabbled in making my own bread for a few months, but when I spotted a picture of RAINBOW bread on Pinterest, I knew I had to try it. My boys thought this was one of the coolest things that I have ever made! My oldest sons teacher even sent me a note home telling me that his rainbow sandwich was a hit during lunch time. 

If you have ever wanted to try to make your own bread, this is the recipe to start with. It is easy and does not take very long to make.


The recipe makes 2 loaves and is for a basic very soft white bread that could easily be changed to a wheat bread {just use 3 cups wheat flour and 3 cups white flour in place of the 6 cups white flour}.  

Its actually perfect for sandwiches because it stays soft {I wrapped one loaf in press & seal wrap, foil and froze it for later } and is easy to slice into normal sandwich bread thickness.


Ingredients to Make 2 Loaves:
-2 cups warm water 
-2/3 cup sugar
-1 1/2 tsp salt
-1/4 cup canola or vegetable oil
-3 cups all-purpose flour
- 3 cups of whole wheat flour
-1 1/2 tbsp yeast
-food coloring


In a large bowl, dissolve the sugar in the warm water.


After the sugar is dissolved, stir in the yeast.


, Allow the mixture to "proof" until the yeast resembles a creamy foam.


Into the yeast mixture, add the salt and the oil. Gradually mix in the flour, only one cup at a time. On a lightly floured surface, knead the dough until smooth and place in a well oiled bowl, turning the dough to coat. Cover the bowl with a damp cloth and allow to rise until doubled in bulk. This usually takes about one hour.

Once the dough is finished, remove the dough from the pan onto a lightly floured surface. Divide the dough into 6 equal pieces, using a knife.


Mix in the food coloring to each dough ball to get the colors of the rainbow; since the food coloring is liquid you will probably need to mix in a bit more flour with the coloring to keep a nice, not too sticky dough {make sure you keep them separate and you probably don't want to set them on your counter, they may stain it with the colors}:
RED: red food coloring
ORANGE: a combination of red and yellow food coloring
YELLOW: yellow food coloring
GREEN: most basic packages of food coloring have green in them, although if yours doesn't mix a combination of yellow and blue
BLUE: blue food coloring
VIOLET/PURPLE: a combination of red and blue food coloring


 To assemble the RAINBOW, lightly grease your work surface and your rolling pin.
Roll the red out to a roughly 11 x 14 inch rectangle, then place it on another greased surface. Use a knife to cut the dough in half.


Grease 2  9x5 loaf pans.Carefully roll each half into a log. Place into your prepared pans. Preheat oven to 350 degrees.
Place loaf pans on the top of the oven, cover with a clean kitchen towel and allow to rise about 30-45 minutes (the heat from the preheating oven will help the dough rise). 
Bake for 30 minutes. 


Wait 5-10 minutes and remove bread from pans, place on wire rack to cool completely.


Monday, February 18, 2013

Babysitter Info Sheets

My boys are my whole world! And when my husband and I get the rare moment to go on a date night, we call our favorite sitter to come and hand out with our rambunctious boys. There are times though were we have to call a different sitter when ours is not available and I always try to ensure she is all set with any piece of information that she could need.

Being 6 and 3, I am sure my boys keep their sitters busy with playing soldiers or taking them outside to jump on the trampoline, so I want to make sure that if there is anything that she might need, it is readily available for  her. 


I found this Babysitter Info printable online and thought it was a great idea. I have a folder up on the wall of my pantry that holds recipes or extra papers I might need and now holds a blank stack of these. You can download a copy of the sheet here.

This is the example from the link above. 

Saturday, February 16, 2013

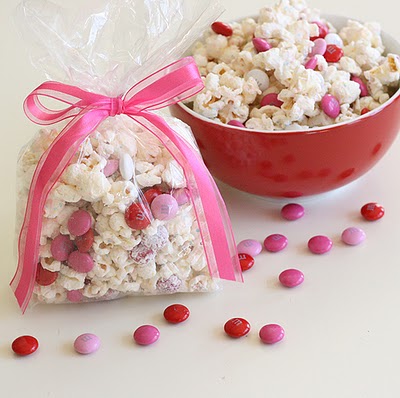
Sweet and Salty Valentine Popcorn


I always like to have little treats around for the boys during the holidays. I usually leave them next to their door so that when they wake up they have a nice little surprise waiting for them. As most moms know, kids have WAY too much when it comes to knick knacks and toys, so I usually go with something they can eat. Who doesn't love holiday treats?!

So for Valentines I am going with something, cute, sweet and festive. Valentine popcorn! I mean could anyone resist popcorn covered in candy melts, sprinkled with sea salt and tossed with red and pink M&M's...I think not. Happy Early Valentines Day!


You will need:

1/2 cup of unpopped popcorn
1 bad of candy melts
1 bag of Valentine M&M's
sea salt

First, pop your popcprn and set aside.

Now over a double boiler on low heat, lets melt the candy melts. Stirring occasionally so they do not burn.


Once completely melted, pour over the popcorn and toss until the popcorn is fully coated.


Add sea salt to taste.

Add in the M&M's. 


On a sheet pan covered in wax paper, spread the popcorn onto the wax paper and let it sit there until it has set, dried. 


source


Now go and enjoy it with your kids, your Valentines or keep it all to yourself!

Tuesday, February 12, 2013

Fat Tuesday Dinner


Shrimp and Grits. Probably one of the most alluring combinations in the world. Not only did this Southern girl grow up on grits but I am so looking forward to our impending move to New Orleans to taste a new version of Southern food. Not only a new version of shrimp and grits, but to be introduced to the wonderful creole food culture.

I have never been to Louisiana and from what I have heard from my husband, it is just like the South with the volume turned up a little. The lingering smell of food, the beautiful architecture and the sultry sound of Jazz music. I am very excited.

To celebrate Fat Tuesday and our upcoming adventure to our new home town, I thought it was necessary to have a dinner fitting for a day like this. 


For those of us who take their grits seriously, I suggest using the coarse-ground variety for this quintessentially Southern dish.
FOR THE GRITS:
1 tbsp. salt
2 cups coarse-ground grits
3 cups milk
FOR THE SHRIMP:
4 slices bacon, cut crosswise into 1" pieces
1 lb. medium shrimp, peeled
1 small clove garlic, peeled and chopped
1⁄4 cup white wine or dry sherry
1⁄2 cup heavy cream
2 tbsp. minced fresh parsley leaves
1. For the grits: Bring 4 cups of salted water to a boil in the top pot of a double boiler set over high heat. Meanwhile, fill the bottom pot of the double boiler about halfway with water and bring to a boil over high heat, then reduce heat to medium. Gradually pour grits into the salted water, stirring constantly with a wooden spoon to prevent lumps, then fit pot onto the bottom pot of the double boiler. As the grits absorb the liquid and thicken, about 2 minutes, add 2 cups of the milk and cook, stirring frequently, until grits are tender and creamy, about 45 minutes. (Thin with some of the remaining milk if grits become too thick.) Cover pot and reduce heat to low while preparing shrimp.
2. For the shrimp: Fry bacon in a medium skillet over medium heat until browned and crisp, then transfer with a slotted spoon to paper towels to drain. Discard all but a thin film of bacon drippings from skillet.
3. Increase heat to medium-high and add shrimp, garlic, and three-quarters of the bacon to same skillet; sauté, stirring often, until shrimp are just pink, about 3 minutes. Add wine, scrape any brown bits stuck to bottom of skillet with a wooden spoon, and cook until alcohol has evaporated and reduced slightly, about 2 minutes. Add cream and cook, stirring constantly, until sauce has thickened, about 2 minutes more. Divide grits among four bowls, then spoon shrimp and sauce over grits.

Sunday, February 10, 2013

DIY Natural Room Scent

I am one of those people who absolutely love to have my house smelling amazing. Whether it is the lingering scent of something baking, my overused Scentsy warmer or a new obsession of mine DIY Natural Room Scents. 

I don't use them as much as I would like to because it usually requires you to keep your stove on and with two smaller children I just don't seen comfortable with that. But I did find a solution. I bought a small crock-pot. Now I don't have to worry about the stove being on and the crock-pot can be put out of reach from the kids.

One of my favorites scents is anise. I know its so cliche, but there is something about that sweet yet spicy aroma that I just love. 

I stumbled across a new room scent that included anise and as soon as it started to warm in the crock-pot I knew I had found my new favorite scent! These are super easy to make and can be customized to your preferences. Play around with some of your favorite scents to come up with new fragrances. 

What you will need---Oranges, cinnamon, cloves, allspice and anise. One reason it is my favorite scent is for it's staying power. This scent carries into multiple rooms better, and it can be reheated to scent your rooms for several days. 

source

How to heat it using a mini slow cooker. Mine only has one low heat setting. The mixture never actually bubbles and visibly steams. I leave it uncovered on my kitchen counter to slowly release scent throughout the day. It's subtle, but creates a pleasant smell in my kitchen and a hint of scent in surrounding rooms. When I'm home, I keep my mini slow cooker going. It's easy and uses very little electricity. When I fill mine in the morning, it won't dry out for an entire day. If you're concerned about accidentally letting it run dry, you can put a lamp timer on it so that it automatically shuts off at the desired time.